
|
|
|
|
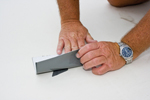
Coating an RV metal roof composed of steel involves an extra bugaboo to work with: rust. In this case, coating preparation requires an additional and critical step to deal with the rusted areas. First, sand off any loose rust with an emery cloth or emery paper, sandpaper or wire brush. Then clean the rusted area as well as you can, getting off all the residue and letting it dry. At this point I recommend you apply a specially formulated RV metal roof rust inhibitive primer. Remember to allow the primer to dry before coating. This will do three things: Seal the rust spots so they’re not going to return, prevent the rust from spreading, and ensure the rust won’t bleed through your coating job. At the same time, examine the rest of the roof for any weak spots or seams that could leak. You might need to cover these areas with Coating Ready Cover Tape. Rudy Tip: |
|
Don’t do Coating Ready Cover Tape repairs until you are ready to actually coat the roof. The tape is made to be used with the coating over it and its performance could be compromised if it gets wet or dirty from sitting out too long before coating. |
|
Also, a couple weeks before you do any of this, check the seals around the roof edges along with vents, antennas, and anything else sticking out of the roof. Do whatever repairs you need to make to the lap sealant at that time so that is has a good two weeks to fully cure before coating. To see video about sealant repairs click here Just before coating, clean the entire roof and let it dry. To be sure dirt and contaminants in the rinse run-off don’t find a way to embed themselves into the sides of your RV, I recommend masking off your unit using plastic sheeting and Frog Tape ®. Make sure the plastic completely covers the sidewalls along with both front and rear caps, just as you would to avoid spilling paint on something. |
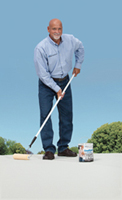 |
Once everything is dry, do any needed repairs using the Coating Ready Cover Tape and proceed to apply one coat of Metal RV Roof Coating. Use a medium nap roller and keep working the roller in the same direction either across the length or width of the roof. Wait for that coat to dry. It will take an hour or so depending on the temperature and relative humidity. Then put on a second, finishing coat, working the roller this time in the opposite direction, crisscrossing the first coat at a 90 degree angle. |
|
I like to have three to four hours of direct sunlight shine on the finished roof to help it dry. It usually takes between 24 and 48 hours for the coating to completely cure. Make sure the roof remains dry during this time period. As always, I advise people doing this themselves to take extra care when on the roof, or use scaffolding if possible, and work in manageable 3’ X 3’ sections at a time, going back and forth from one side of the RV roof to the other. It also helps to do this all in a day so your prep work isn’t contaminated by dirt or the weather. For aluminum roofs, the same procedures apply, only you won’t have to deal with rust spots and you don’t have to prime it. You may find some extra oxidation that will require a little more scrubbing to get off. Still apply two coats, making sure the first coat is dry before applying the second. Happy Coating! |
Rudy Tip:• If there is any question whether your roof is aluminum or steel, use a magnet, as aluminum is not magnetic. |
 |
|
Next: Coating a fiberglass roof. |
You are receiving this email because you have asked to receieve industry related product and service announcements from Dicor Products. If you would no longer like to receive these emails you may unsubscribe at any time using the link below. |