
|
|
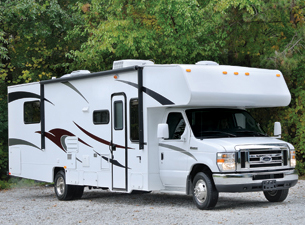
Easy does it: How to identify and install the right wheel covers and simulators. One of the easiest and simplest ways to dress up your motor home is by adding stainless steel wheel covers or simulators. They are easy to install — no power tools, jacks or special knowledge required. If you can fasten a few nuts with a simple hand tool you can give your wheels a bright new look that will make people stop and admire. You just need to know a few things about typical motor home wheels and how to find the right match for your particular wheel set.
 |
First, a few definitions and a note about how these wheel coverings work. To be clear, what we are calling a “wheel” is what some refer to as simply “rims.” The wheel basically consists of these parts: the mounting plane, where the wheel attaches to the axle hub with lug nuts; the “rim” — the outside part of the wheel to which the tire is attached (and that point of attachment is called the “bead seat”); and the “web” or inside part of the wheel that connects the mounting plane with the rim. |
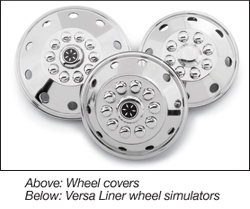
Wheel Covers vs. Wheel Simulators
What we commonly refer to as “wheel covers” look the same on both the front and rear wheels of a motorhome and are usually a convex design with the protruding center fitting over the lug nuts on the mounting plane. What we call “wheel simulators” are coverings that follow (or simulate) the shape of the existing wheels, which on motorhomes are convex in the front and concave in the rear.
Let’s look at 16-inch and 16.5-inch wheel covers. Those two sizes are held on to the wheel using a hubcap type retention system. These covers have retention clips and fingers that bite into the wheel itself, enabling the cover to be snapped into place with a forceful hit from your hand and secured with a few taps on the outer edge of the cover with a rubber mallet. Be careful not to damage the cover when using the rubber mallet.
For larger wheels, such as those 19.5 inches in diameter, a different method of attachment
is 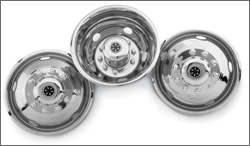 used. As these wheels go down the road
they flex, which can easily pop off a cover using retention clips as a fastening system. Covers for 19.5-inch wheels are held on with a bracket system that is attached to the wheel or hub of the wheel.
The front brackets are attached two different ways depending on the type of chassis your unit is built on. For a GMC, Chevrolet and Workhorse chassis, the bracket is attached to two dowel pins located directly across from each other on the mounting plane. On all other chassis this bracket is attached with jam nuts that use the exposed threads on the wheel studs above the lug nut. In either case, the flat bracket has a centered, threaded mounting stud by which the cover is attached and secured. For the rear wheels, a bracket with legs is attached to the wheel hub to again provide a single, centered, mounting stud that secures the cover.
Now let’s address simulators. Dicor Products has two different types of wheel simulators, FastLiners™ and Versa Liners™. FastLiners are available in 16-inch and 16.5-inch sizes. FastLiners utilize the hubcap retention system we discussed earlier. Versa Liners use a mechanical attachment system. This system uses two jam nuts encapsulated in lug nut covers to hold the simulator on a wheel.
Getting the Right Match.
Now, how do you go about finding the right wheel cover/simulator for your motorhome?
Here are the things to note that will give you the proper information from which you can purchase your covers or simulators.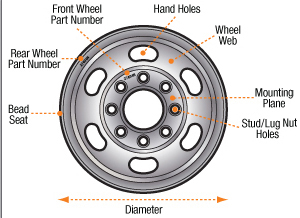
• Wheel size or diameter
• Number of lug nuts
• Number and shape of hand holes
• Any special part numbers
• Chassis manufacturer
To explain:
• Wheel size is usually expressed in inches as the diameter of the wheel, which for motorhomes will be either 16 inches, 16.5 inches, 17 inches, 19.5 inches or 22.5 inches.
• Most motorhome wheels have eight or 10 lug nuts.
• Hand holes: Found in the wheel web between the mounting plane and the rim. Covers and simulators should match the holes on your wheels. It’s helpful to note whether they are round or oval as well as how many. A good match in size, number and shape is important here because one of the functions of these holes is to let in the right amount of air through the wheels to help cool the brakes.
• For older Firestone® - Accuride™ wheels used on many motorhomes, you can also obtain a simple part number that covers these specifications, which will start with the numbers 27, 28 or 29, that is stamped on the mounting plane between the lug nut holes on the front wheels. If for some reason the number is worn off, you can also find it with the rear wheels by looking at the inside flat part of the rim next to the bead seat. Maxion wheels made for Chevy/Workhorse chassis have a wheel part number starting in “w” in the same locations. Some people may find it helpful to take a picture of the number and the wheel to email to their dealer for further visual confirmation.
• Chassis manufacturer: Many wheel specs are organized by chassis manufacturer and they may have different part numbers and configurations for similar wheel sizes.
Armed with this information, you should be able to find the right cover / simulator set for your wheels and give your motorhome a bright new look with just a little time and effort.
Next: Tire inflation basics for RVs.